Gitalk部署基本流程
首先说下Gitalk部署的基本流程吧,我是部署到github pages上的,并且用的是模版,jekyll的文件结构大同小异,不太清楚的可以直接去官网看看,大概知道每个文件是干嘛的就行。
-
首先我们需要申请一个OAuth Application。主要通过它来操作github仓库的读写。
-
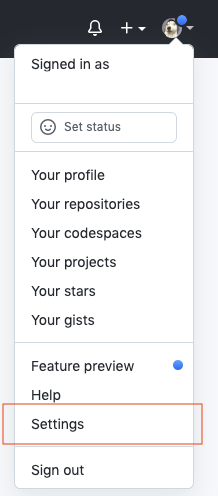
进入github主页,点击右上角头像。
-
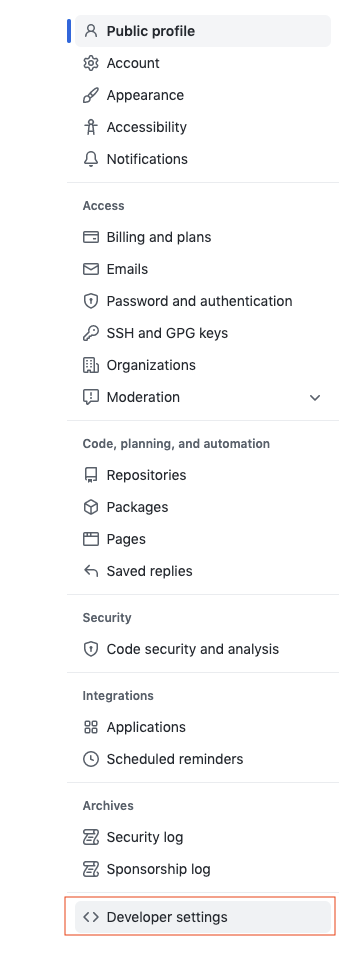
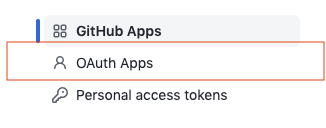
选择Settings,然后选择Developer settings->OAuth Apps->New OAuth App

-
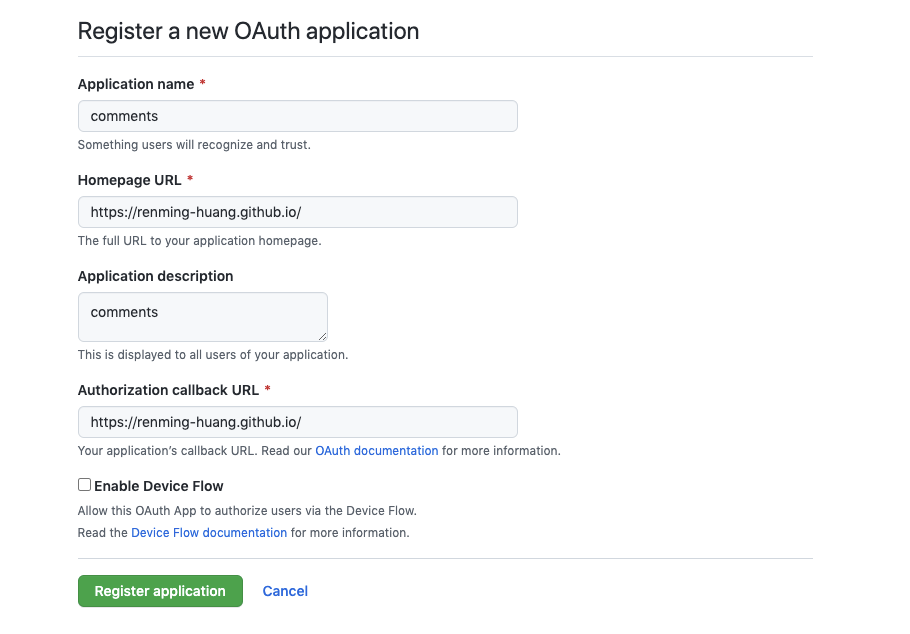
然后填写相关信息。其中Application name 和Application description可以随便填写。Homepage URL和Authorization callback URL都填上你的github pages主页的地址就行,注意不是仓库!!!!
-
注册成功后拿到Client ID和Client secrets这个地方就算完成了。
-
-
打开config文件填写信息。如果你的模版本身就支持了Gitalk,那应该能找到类似这样的配置
1
2
3
4
5
6
7gitalk: enable: true clientID: "1c289afbe56524e709f3" clientSecret: "3c1fa189bb28f26584c27719863ff32fdafbfb87" repo: GitalkComments # colingpt.github.io owner: RenMing-Huang # colingpt admin: RenMing-Huang # colingptclientID和clientSecret填上就好。repo是你存放评论(issue)的仓库名称,owner是你的登陆github的用户名,admin是有权限初始化评论的人,如果你没有其他小伙伴(像我一样的孤寡),这里填自己就行,如果有多个人,应该是这样填写[user1,user2,….]。
如果我们的模版不支持Gitalk呢,请看官网的详细教程。简单来说是在你的JavaScript里插入这样的配置:
1
2
3
4
5
6
7
<link rel="stylesheet" href="https://cdn.jsdelivr.net/npm/gitalk@1/dist/gitalk.css"> <script src="https://cdn.jsdelivr.net/npm/gitalk@1/dist/gitalk.min.js"></script> <!-- or --> <link rel="stylesheet" href="https://unpkg.com/gitalk/dist/gitalk.css"> <script src="https://unpkg.com/gitalk/dist/gitalk.min.js"></script>这两个随便引入一个就行,然后在html中要放入评论的地方插入
1
<div id="gitalk-container"></div>用下面的 Javascript 代码来生成Gitalk插件
1
2
3
4
5
6
7
8
var gitalk = new Gitalk({ clientID: 'GitHub Application Client ID', //上面申请的Client ID clientSecret: 'GitHub Application Client Secret', //上面申请的Client Secret repo: 'GitHub repo', //GitHub仓库,评论可以在里面查询 owner: 'GitHub repo owner', //GitHub的用户名 admin: ['GitHub repo owner and collaborators, only these guys can initialize github issues'], //这里也是填GitHub的用户名,不过是数组形式,如['user1','user2'] id: location.pathname, // Ensure uniqueness and length less than 50 唯一值,并且少于50个(其中一个坑),主要就是用来根据你的文章生成一个issue,后面会讲到。 distractionFreeMode: false // Facebook-like distraction free mode})gitalk.render('gitalk-container') 这里具体功能我还不清楚.到这里我们把它部署到我们的github pages上去,应该就能看到插件了,但是百分之90你会遇到下列问题。
Error:Not Found
这个问题一般是你的仓库没设置对,它只需要你存放issue的仓库名,你可以重新创建一个仓库,也可以使用你主页的仓库。如果不知到是否正确,可以这样做:
进入你的主页,点进一个由Gitalk插件的页面->检查元素(检查)->选择Network,如果什么都没有就刷新页面->找到一个issue的文件,看看他的Request URL是不是和你的仓库路径一样,如果不一样说明你确实仓库写错了,需要改一下上诉说的config配置。我的问题就是这样解决的。


Network Error:
这是最让我头痛的问题,也是我花时间最久的问题,查过Gitalk的Issue,也百度了很久,基本都是一样的回答,问题就是它使用的代理过期了,什么是代理?先看看这位作者的文章,因为我们的网站和github.com不是同源,所以需要代理,Gitalk默认的代理是这样的https://cors-anywhere.azm.workers.dev/https://github.com/login/oauth/access_token,可以看到有两个https,前面那个就是用到的代理,总之,问题就是这个代理不能用了,或者访问受限。有人说自己弄一个代理,反之我不会,感兴趣可以去弄一弄,就在准备换其他插件时,偶然看到一个代理https://cors-anywhere.herokuapp.com/https://github.com/login/oauth/access_token能用,但是能用多久不得而知,反之先用着,能看到效果就好。具体做法就是在config添加proxy
1 | |
然后在我们的gitalk.html文件里加上proxy: 'https://cors-anywhere.herokuapp.com/https://github.com/login/oauth/access_token'
1 |
|
再部署上去就可以看到效果啦。可以访问我的文章看看噢(^-^)。
Error: Validation Failed.
这个问题就是前面id的地方埋下的伏笔,一般来说,模版会使用文章的url来作为id,Gitalk也会使用id来创建一个issue作为评论区,后续每篇文章的区分也是通过这个id来区分,但是github的id最长只支持50个字符,而我们的url很容易就超出去了。于是,我采用了一个方法,在每篇文章单独添加字段来设置这个id,如下:
id: 'Gitalk Error And Solution',
1 |
|
如果觉得麻烦,也可以使用文章的标题作为id,id: 'Gitalk评论插件',
但是这样你的文章标题就不能超出50个字了(中文标题还好,但是像我读论文会吧论文名加上去,又是英文,就容易超出)。